

By Karen Quinn
There is something romantic and melancholy about the Earth Mother closing out the heat of summer and preparing herself for the cold winter’s embrace. We instinctively feel the shift and are compelled to engage with the natural world, seeking to bask in the cascades of warm yellows, reds, and oranges in the trees and almost methodically find our way to apple orchards, pumpkin patches, and forests to take in the beauty and bounty of the season.
As you find yourself wandering, I invite you to explore and engage with the flora around you and enjoy the excitement of self-sufficient foraging, even if it’s only a little. The best part is most wild edibles can be found in your very own neighborhood or local park!
Chicken of the Woods

The Chicken of the Woods is an edible mushroom that comes from the Laetiporus sulphureus family. Its distinct shape, color, and growing habits, in addition to its lack of poisonous “look-alikes,” make it a wonderful option for first time foragers! The Chicken of the Woods, sometimes referred to as the Chicken Mushroom, grows on both living trees and rotten logs or stumps. The younger fungus ranges from bright yellow to orange, older, well-established colonies can even have a tint of ruddy red mixed in. When the fungus gets older, it turns more to a pale yellow and white. You want to harvest the mushroom when it is young for the best texture and flavor which is said to be how it got its namesake. The texture is described to be much like cooked chicken and the flavor lends itself in that direction as well. This makes this mushroom a forageable wonder for vegetarians as a chicken substitute in recipes. That’s my family’s favorite way of utilizing them—especially in soups and stir fries. Simply wash off any debris, chop them up in the desired configuration, and treat them like any other meat or mushroom.

If you have a plentiful harvest and want to preserve your bounty for later, there are a few options I have used that have worked very well. You can freeze them by washing them and then sweating them in butter. This is done by adding them to a hot pan of butter and sauteing them just slightly to get a layer of fat on the surface of the mushroom. Allow them to cool, then put them in a vacuum sealed bag or a Ziplock with as much air removed as possible. Another way is to slowly dehydrate them by placing them on a baking sheet or dehydrator rack in the oven at its lowest setting and turning them every 30 minutes if on a baking sheet. After all the water is removed, put them in an airtight container, and store in a cool, dark area. When you are ready to use them, gather your desired amount, and place it in a bowl of water for 10-30 minutes to rehydrate it; then, cook as normal.
Black Walnuts
The Black Walnut tree, or the Juglans nigra, is a native tree to North America that is both prized and despised equally. On one hand, they are a constant source of nuts, and their wood is prized by woodworkers for its beauty and versatility. On the other hand, they are messy, and the juglone they produce can wipe out anything in the nightshade or solanacea family (tomatoes, peppers, eggplants, potatoes) that are planted too close to them. I have five old black walnuts in my backyard, and I can personally say I fall into both sides of the argument. I love their gifts of abundant free nuts each fall, but they truly are messy and have been the reason for more than one of my tomato growing failures. But, in the bigger picture, I love them.
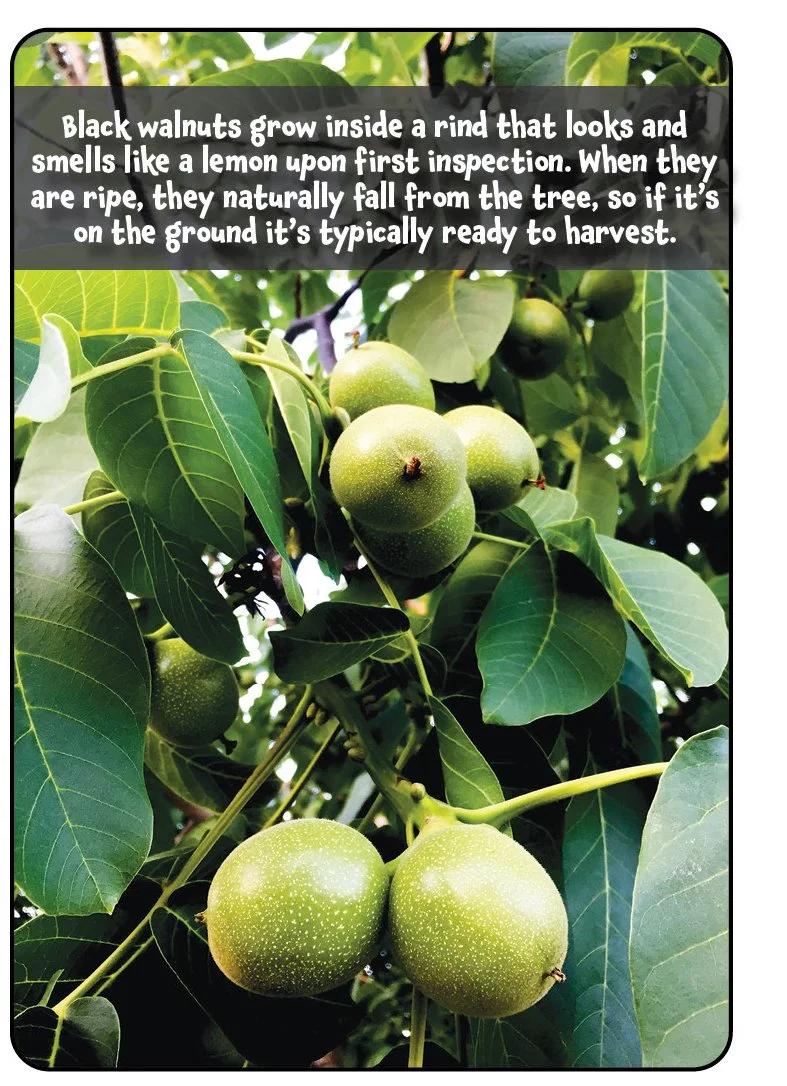
Black walnuts grow inside a rind that looks and smells like a lemon upon first inspection. When they are ripe, they naturally fall from the tree, so if it’s on the ground it’s typically ready to harvest. We use a tool that is meant to pick up golf balls: it resembles a wire ball on a handle. It rolls over the ground and picks the ripe walnuts up for us. Then, we empty them into paper lawn bags or cardboard boxes for storage until we can process them. We found that if you put them in buckets they don’t “breathe,” and get moldy. Once the walnut husks are no longer green, and have turned to a more yellowish-brown color, they are ready for hulling (removal of the husks).
For this part of the process, you will want to get some really good rubber gloves because they are messy; don’t wear anything you care about too much. You’ll also want an empty cardboard box or paper grocery bag and a bucket (food-safe, if you can). At this stage, the hull should peel right off. If it doesn’t come off easily, simply set it aside and wait a few days for it to finish ripening. As you work, place the peel into the bucket and the hulled nut into the bag or box. Both parts of the nut have a purpose. Obviously, the nut is the forageable food, but that messy husk has a host of uses. It can be used to make tea, tinctures, natural dye for fibers, and black walnut ink, which is my favorite way to use them.
Once you’ve hulled your walnuts, there are a few ways you can preserve them. One is to keep them whole until you are ready to use them. You would just give them a quick rinse to get any remaining black ink off them, and let them dry in a cool, dark place with good air circulation for a day or two. When I use this method, I store them in old onion bags for ventilation. Another way is to crack them and store their meat in the fridge or freezer. No matter which method you choose, eventually you’ll need to extract the nut from the shell. There are a host of contraptions out there to do this for you, but our favorite pastime is the cloth and hammer method. Gather a bowl, another bucket, a clean cloth or towel (the cloth is just to keep the shells from flying all over the place), a good hammer (we use ball peen hammers for this) and a heavy-duty working surface (the garage floor works just fine as well). Lay your cloth out on the surface, place a nut on the cloth (pointy side down, if you can), fold the cloth over the nut, and give it a whack with the hammer. This part takes a bit of practice, since you don’t want to smash it to bits, but you do want to crack it sufficiently. Ideally, the shell will split into 2-3 pieces that you can then remove the meat from the shell with a nut pick, placing the nut in the bowl and the shell in the bucket. The shelled nuts can be stored in the refrigerator for about a year, or you can freeze them.

Disclaimer: Don’t try to compost any part of this process, as the juglone will “poison” your compost and kill any nightshade you plant in it. Either dispose of it through yard waste or put it back out under the trees.
Rose Hips
Rose Hips, or Rosa canina, are the fruit of the rose plant. Cultivated roses produce them, but wild roses also create this delicacy. Michigan has seven native wild roses that can be found on pathways, in the forests, and along riverbeds. They are produced after the rose has finished blooming and are ready for harvest when they are a bright red. If left on the plant, they persist through the winter and offer sustenance to the bird and animal populations in the area. These fruits are highly prized, since they are high in Vitamin C and can be used in everything from simple teas to health and beauty products.

The best way to make sure you are harvesting wild rose hips, is to identify the plant in the summer when the flowers are in bloom. Their growth pattern is much like a wild black raspberry with long, thorny stems that grow in an arch with leaves that are small, lobed, and mirrored. The thorns, plus the presence of the red rose hips, are another way to identify them if you happen upon them in autumn. Luckily, there aren’t any poisonous “look-alikes,” so this is another great first-time forage activity for beginners.
In the case of rose hips, the longer you let them stay on the plant, the sweeter they will become. So, waiting, in this instance, is a good thing. I find that the rose hips that are just getting wrinkly when I harvest them are the tastiest.
After you harvest and wash your rosehips, being sure to remove any stems, the best ways to preserve them whole are drying or dehydrating and freezing. I tend to dehydrate about a half-pint of them to keep for teas until harvest season the next year. Then, I use the rest to make infused oils for body products and cooking. I’ve also made rose hip jelly in exceptionally productive years. The versatility of this forageable is vast, so I encourage you to do a search on your own and see what sounds fun and interesting to you! Your local library is another wonderful resource for this as well. Some of my favorite ideas have come out of old flower cookbooks.
No matter what you decide, I hope these suggestions at least spark a desire in you to get outside, connect to the world around you, and enjoy the magic of nature.
Karen Quinn is a writer and artist who homesteads on a rural urban farm in Livonia,Michigan with her husband, son, and menagerie of animals. Her favorite things are napping, exploring, and drinking tea.
Related Content:


As a gardener, and a general nature romantic, my heart begins to feel torn around mid-February. On one half, I want to honor the last of winter’s deep rest and on the other half, there is the burgeoning energy of spring’s return. One of my favorite activities at this time is to thumb through my seed stores, as well as the new year’s seed catalogs, and begin to plan my garden in earnest.