

By Emily Springfield
It’s the perfect time to preserve the abundance of the local harvest—and make meal prep a snap all through the winter! If you’ve only used your dehydrator to make apple rings and kale chips, get ready to fall in love with dehydrating some new vegetables and learn how to use them to make fast, nutritious meals.
Winter Workhorses: Cabbage, Greens, and Squash
Cabbage, greens, and squash are in constant rotation in my winter meals. All are easy to source locally, and all dehydrate very well with proper preparation. Cabbage can be any color. Greens can include fall staples like kale, chard and mustard, and even wild greens like dame’s rocket or lamb’s quarters. Both summer types of squash like zucchini and winter types like butternut and acorn can be dried, though they need different preparations.
Dehydration is Perfect for Veggie Leftovers
If you have a CSA share or buy root vegetables at a farmer’s market, your beets, radishes, and turnips probably come with the leaves attached. Dehydration is a perfect way to use the greens! And if you discover a few zucchinis that hid in the garden until they were too big to sauté, you can easily prep them for drying instead of sending them straight to the compost bin. You can also find “over-large” zucchini at the market or farm stands at very inexpensive per-pound prices, making them a very affordable way to bulk up the winter pantry.
Food Dehydration Basics
Dehydration preserves food by removing water so mold and bacteria can’t grow. The resulting product is leathery, or even brittle, in texture and takes up far less space than fresh or frozen vegetables. It’s shelf-stable and needs no electricity to keep it fresh for months or even years. And, though the dehydration process causes food to lose some nutrients (especially vitamin C), it’s so handy to have whole, additive-free vegetables on hand you might find yourself eating more of them, making up the difference.
Tools: There are two categories of tools you’ll need: cutting implements and a dehydrating device. While you can use a knife to prep your vegetables, I usually find a food processor, box grater, or mandoline to be preferable. They are fast and make very even slices and shreds. I’ve tried a number of different dehydration devices, and each have positive and negative points.
Oven: Pros: it was already in my kitchen. Cons: The lowest setting on my oven was too hot (temp should be maximum 150 degrees) and it took a lot of fiddling to dry the food without cooking and burning it.
Window screen on a box fan: Alton Brown popularized this method, where you lay a box fan on its back on a milk crate, then put a window screen or furnace filter on top of this to hold the drying food. Pros: Works quite well for apples; very energy efficient. Cons: I’m concerned about whether the surfaces are food-safe; can’t dry much at once; not good for small shreds of food.
Hanging drying racks: Pros: Inexpensive; use no energy. Cons: Michigan’s relative humidity is frequently above 40%, which means food will likely spoil before it dries.
Purpose-made dehydrators: Pros: Fastest to use; no worries about over-cooking food. Cons: Most expensive to buy (but you can often find them used) and bulky to store. Note that you don’t need a very fancy or expensive machine to do the job. I prefer square models with stainless steel racks over round models with plastic racks, but there’s not a large difference between “economy” and “expensive” brands within those criteria. Silicone “fruit leather trays” are very helpful, especially if you will be drying a lot of squash puree or other sticky produce.
How to Dehydrate Vegetables
There are just four steps to making great dried vegetables*:
Wash
Cut
Dehydrate
Store
*See table below
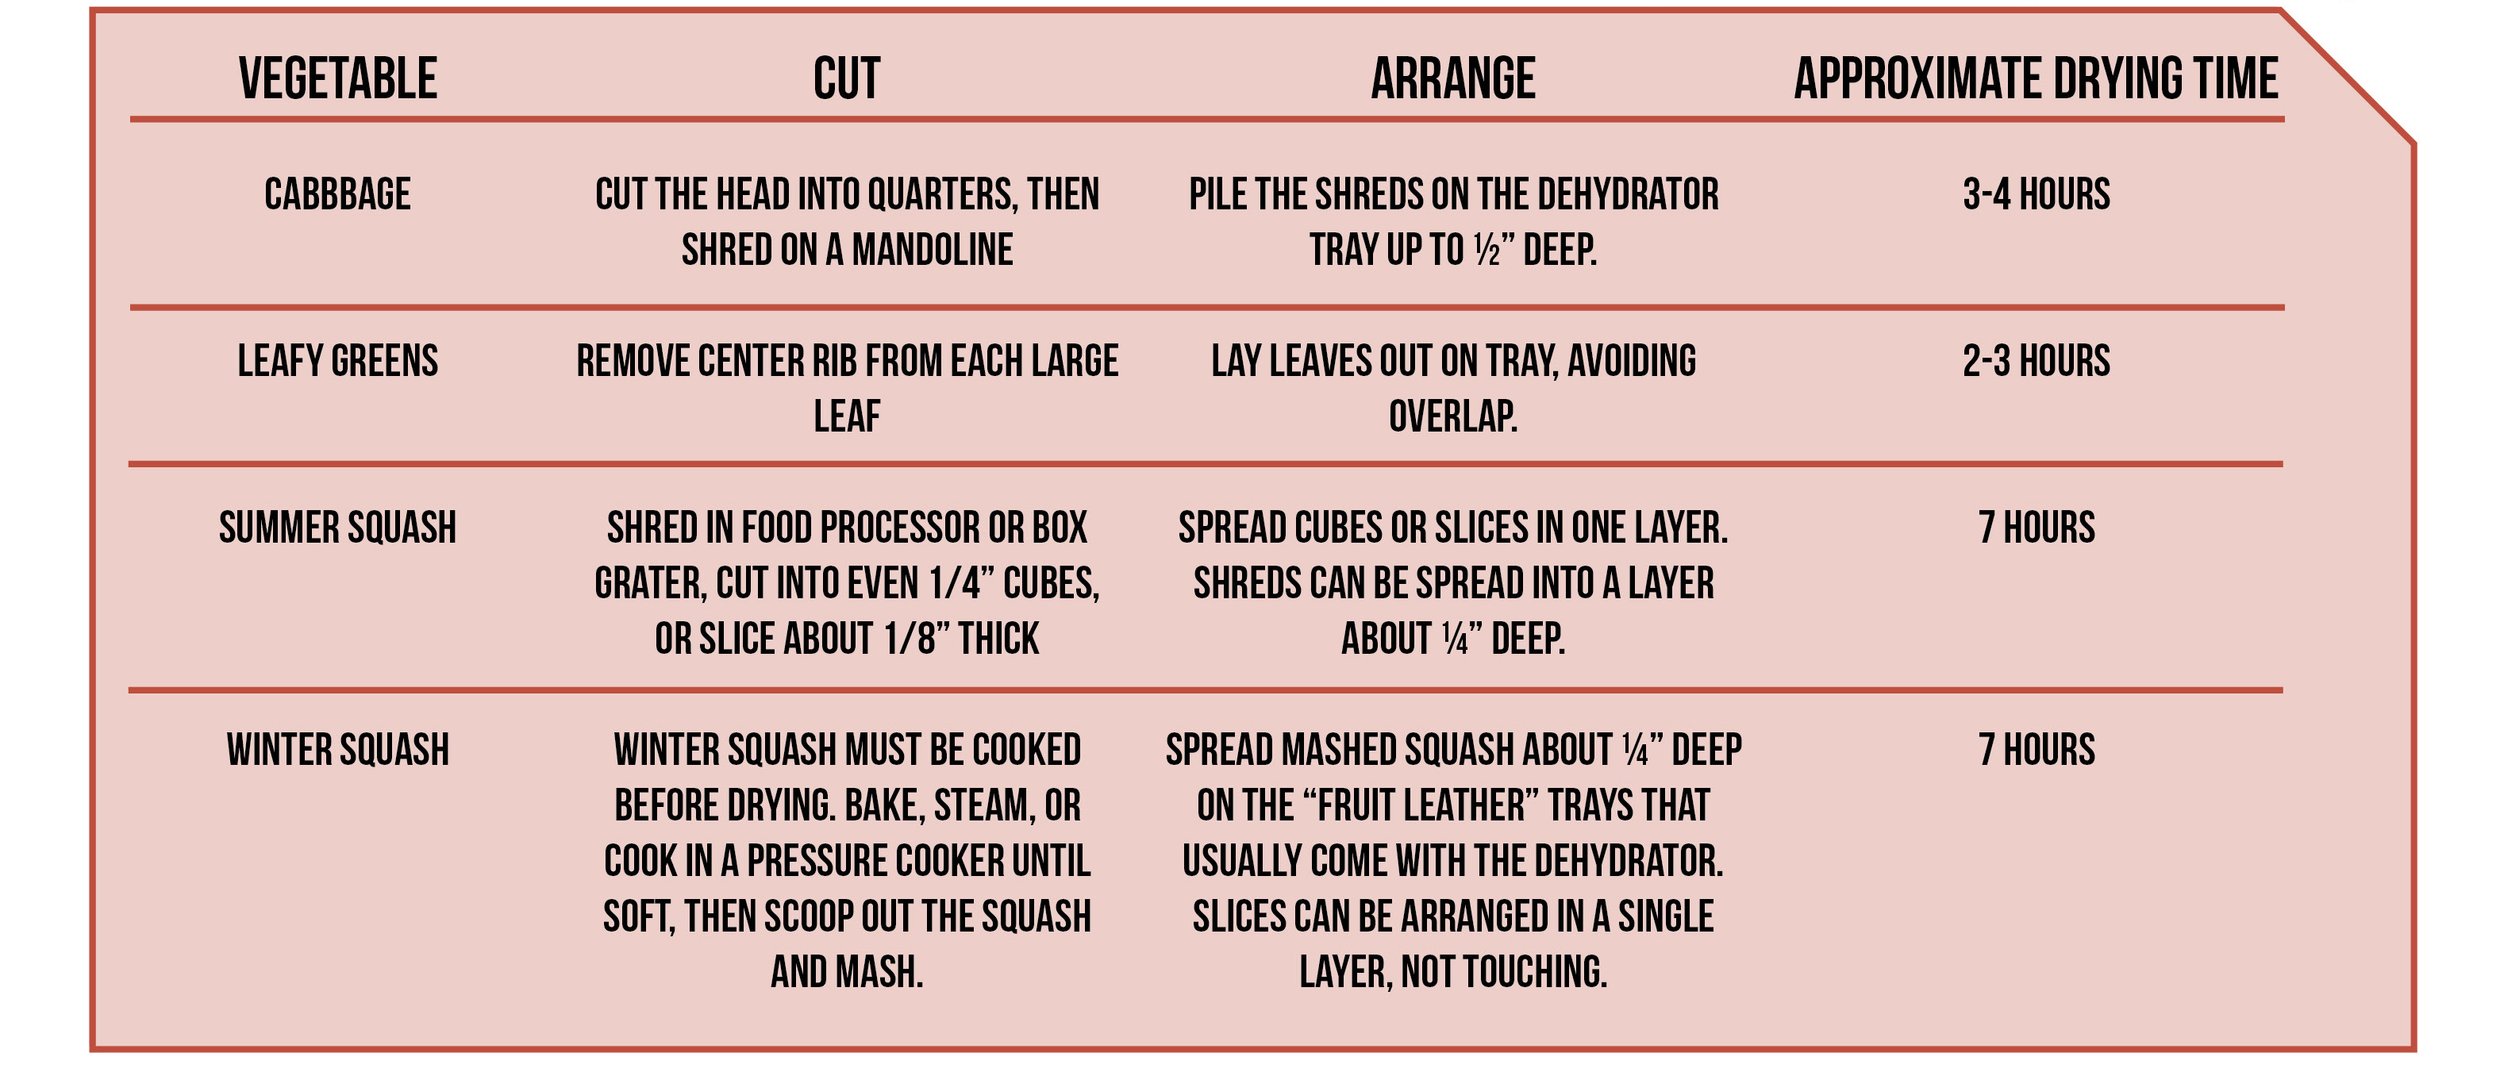
You’ll notice that I don’t blanch most vegetables. After you wash your veggies and pat them dry, follow this chart for cutting and dehydrating each vegetable. The drying times given are for a 600-watt dehydrator set at 150 degrees.
Dry all vegetables until they are leathery or even brittle. If you find any soft or damp sections, especially where shreds overlap, keep drying! Cool, then store in mason jars or other rigid air-tight containers. Plastic bags usually aren’t adequate against Michigan humidity for keeping dehydrated food really dry.
Using Dehydrated Vegetables
I have talked to so many people who dried a bunch of produce…then never ate it, because they weren’t sure what to do with it! In general, I prefer to use dehydrated veg in soups and stews, because the rehydrated texture more resembles cooked, rather than fresh, vegetables.
Dehydrating vegetables—especially squash—drastically reduces their size. For example, five pounds of zucchini shreds will easily fit into a quart mason jar. It can be disheartening to have your produce dry up “to almost nothing,” but remember—the nutrition is still there! So, when you use them later, you’ll only need about ¼ of the fresh amount.
For more information about dehydrating foods at home, visit:
National Center for Home Food Preservation web site at https://nchfp.uga.edu/how/dry.html.
Eat Close to Home – the author’s web site http://eatclosetohome.com.
Emily Springfield is a Chelsea-area gardener, bodyworker, and herbalist specializing in body energy flows. She uses a combination of nutrient-dense plants, myofascial release, and t'ai chi-based healing to help her clients improve their flexibility, resilience, and emotional health. Visit fenhaven.com for more information.
Screenshot and save the recipes below!


Related content:


“Operate from a position of generosity and humanity. Watch how it benefits your business.” This simple statement is key to the working philosophy of Phillis Engelbert, owner of the Detroit Street Filling Station, North Star Lounge, and The Lunch Room Bakery & Cafe in Ann Arbor. The concepts of generosity and humanity might not be the most common buzz words in today’s business culture, and her central tenet doesn’t come without a cost—but that is not what concerns Engelbert. She recommends it for reasons that transcend the financials.