by Jennifer Carson

As the warm breezes shift to cool caresses on our cheeks and we pull out the warm handmade quilts from grandma and sweaters from mom, many of us turn our thoughts to gift giving. The Julbok is a pre-Christian Swedish tradition that lives on today. Some say he pulled the Tomten’s cart full of presents during the winter solstice. Some say he was the one giving out the presents. Still others claim that he is a prankster that makes sure whomever is receiving the present is worthy of it! Traditionally, the Julbok was made of the last harvest of straw and thought to be good luck. However you celebrate as we move into winter, this sweet little Julbok is sure to be a great addition to your seasonal decorations, a Yule tree, or even as a gift topper.
Materials to make your own Julbok:
8” x 9” rectangle of white wool felt
Red, white, and black embroidery floss
A small jingle bell
A bit of tapestry yarn in tan/brown
Ribbon or other trim for collar
A bit of wool roving for stuffing
Freezer paper
Iron
Small sharp scissors
Basic hand sewing supplies
Optional supplies include:
Two tiny black seed beads
Air or heat erasable marker
To begin:
With a pencil, trace the body and ear pattern onto the paper side of a piece of freezer paper twice. (pic 1) Cut each of the patterns out of the freezer paper close to the pattern, but not on the lines.

Place the shiny side of the freezer paper onto the white felt. Iron the pattern piece into place with a warm iron.
Cut the pieces out on your drawn lines. (pic 2)

Peel the freezer paper off of the felt, but keep one body pattern handy for reference.
Using two strands of floss, embroider the design on his side if you wish. You may find it easier to transfer the design with an air or heat erasable pen before embroidering. I used a chain stitch. (pic 3)

Match the two body pieces. Pin together to keep from sliding if you desire.
With a small blanket stitch and white embroidery floss (I used red for contrast in the photo), sew your goat from the “X” at the top of his front leg to his beard. Use a running stitch across his chin and then continue the blanket stitch until the “X” at the base of his horn. (pic 4)

Use a running stitch to sew the top of the head closed, just beneath the horns.
Continue with a small blanket stitch from the “X” at the base of the horn (on the goat’s back) down to the “X” at the top of his back legs.
Stuff your goat’s head and neck with the wool roving.
Sew his eyes on and embroider his nose and eyebrows with one strand of black embroidery floss. (pic 5) Alternately, you could embroider his eyes using a French knot. After stitching his nose, hide the knot at the “I” where you will attach his ear. (pic 6)
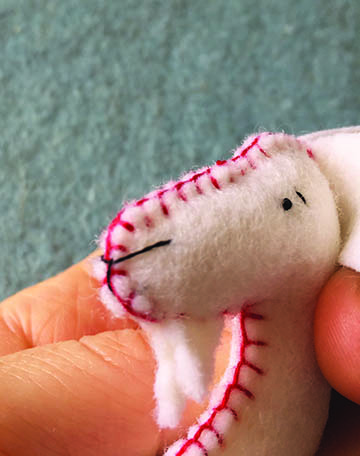

With the tapestry yarn, embroider his hair on his forehead with loose but small loops. To start, insert the needle up the body and through the stuffed neck and head. To tie off, knot your yarn between his horns and bury thread end.
Tie his feet with red embroidery floss, just under the “hairy” ankles. Wind the floss two or three times around the ankle before knotting. Snip the thread ends close to knot. (pic 7)

For his horns, anchor your red embroidery floss at dot on inside of horn. (pic 8) Wind the thread in a spiral down toward the head. (pic 9) Knot the thread on the inside of the horn. (pic 10) Trim thread end close to knot. Repeat for second horn.


Fold ears in half and stitch in place on head, at place marked with an “I”. (pic 11)

Using a piece of ribbon, or other trim, make the Julbok a collar. Sew a jingle bell onto the front center. Tie around neck.
Stitch in a hanging loop with your red embroidery floss at the back of the head just below the horns.
Place a bit more roving in the neck and belly. (pic 12)

Hang and enjoy!
Get all the supplies you need to make your own Julbok ornament in a convenient kit at Crazy Wisdom Book Store and Tea Room!
Jennifer Carson is a local artist and writer with over 60 sewing patterns for both hand crafting and machine sewing. You can visit her online at: thedragoncharmer.com.

Grab this image, scale to size desired, and print!
Related Content:


Some magic is small, like how the laugh of a baby can melt your heart regardless of your state of mind. Some magic is big, like when you run into an old friend in a city of 15 million people you are only visiting for a week. When the likelihood of something happening is way smaller then it not happening, it is called synchronicity.